|
Time to get into the nitty-gritty of code work. This week we have lots of bit operations where we alter data at a low level to see what can be changed simply by detecting and changing bits.
We'll alter the appearance of image files, find lost pictures from an SD card, and manipulate the output of a sound file! Check out these fun an exiting projects from Week 4 of CS50 here.
N A V I G A T I O N
Filter (Less)
I may nerd out a little bit this week. These are honestly my favorite assignments, and always look forward to tackling this each time I've re-taken this course since the first time I encountered it and I am so very glad that it is still in the course!
The theme of this (these?) assignments is image manipulation. Me? I just happen to be a graphics nerd, so this goes right up my alley. That being said, let's move on with the assignment.
This code (the code which CS50 provided) takes in three arguments: a trigger, and two BMP files. The trigger will signify which filter we apply to our BMP. The first BMP argument will be the name of the original file we are manipulating. The second BMP file will be the new file we wish to make and output our changed bits to.
EXAMPLE: ./filter -g images/stadium.bmp grey_stadium.bmp
The code we populate will be in the ancillary class file helpers.c. This houses all of the functions that apply each filter triggered by the first argument we pass when executing our program: -g (grayscale), -s (sepia), -r (reflect), -b (blur). Let's begin!
The goal of this filter is to take in every bit of our BMP image and output it to our new BMP in varying shades of gray. How do we do this?
Every pixel of our BMP image holds a 24-bit map which contains the red, green, and blue values that make up the color for each pixel (RGB). The BITMAPINFOHEADER defined in bmp.h houses a struct called RGBTRIPLE which will allow us account for these values and change them as needed.
To generate the appropriate grayscale value that we need for each pixel, we will need to get that pixel's values (red, green, and blue), add them together, and get their average. After doing this we then apply that average to all three color slots of the pixel. This is because grays are nothing but shades falling between absolute black and absolute white (0, 0, 0 and 255, 255, 255 respectively). What do you notice in common about these values? That's right! They're all congruent across all three colors. So, our shades of gray will also be the same across on a sliding scale between 0 and 255.
Move slider left-to-right to get a visual representation of the grayscale shade numbering.
Grayscale sliding scale example. Shades range 0 - 255.
To start, I will provide the complete code I used to implement grayscale, and then I will break it down thereafter if you wish to learn what each step of the code does:
void grayscale(int height, int width, RGBTRIPLE image[height][width])
{ for (int r = 0; r < height; r++) { for (int c = 0; c < width; c++) { // Get RGB values. float red = image[r][c].rgbtRed; float green = image[r][c].rgbtGreen; float blue = image[r][c].rgbtBlue; // Average the values. int avg = MAX(round((red + green + blue) / 3), 255); // Apply average to all fields. image[r][c].rgbtRed = avg; image[r][c].rgbtGreen = avg; image[r][c].rgbtBlue = avg; } } return; } To begin, we call two for loops on r and c. I name them these to help me keep straight on what pixel I am scanning by row (r) and column (c). For each pixel at (r, c) when then need to grab that particular pixel's RGB value. We do that here since image was passed to us in the function:
float red = image[r][c].rgbtRed;
float green = image[r][c].rgbtGreen; float blue = image[r][c].rgbtBlue; This assigns the red value (rgbtRed (this is defined in RGBTRIPLE)), green value, and blue value to their respectively-named float variables. It is not critical that you assign these as floats (yet), but it will become important later as to the correctness of your conversion later.
int avg = MAX(round((red + green + blue) / 3), 255);
On this line is where floats become important. We are going to average out our RGB values by adding each together, and then dividing by 3. (regular mathmatic process for averaging) This is where the float values become important. Depending on what you are doing with this result, the trailing values after the decimal play a big part - particularly when rounding - to produce the correct color value. If you notice, other than when rounding, we also applying a MAX function. This is just a helper function that I created during this assignment. It takes into account a given integer and if it is over the value we set as "MAX" (in this case, 255), it only returns that max value. Also note, in this particular instance our result will never be over 255 as averaging any of the existing pixel values would never produce a number over 255. Since it is used throughout this assignment, here is a quick peek at the MAX function:
Back to grayscale... the last thing that we do is then take that average we produced in the last step and apply it to the image's RGB values. We apply the same value to all three because as we learned earlier, grayscale is just a shade variation between white and black. White and black are (255, 255, 255) and (0, 0, 0) respectively. So, a shade change between those two would mean evenly decreasing or increasing that value across all RGB channels. Here is that portion of the code:
image[r][c].rgbtRed = avg;
image[r][c].rgbtGreen = avg; image[r][c].rgbtBlue = avg; That's all there is for the grayscale filter! Here is the result across all images that were provided to us from the CS50 team for this assignment:
Drag bars across images to see before and after of filter.
Created using images provided by CS50 after hours of JSFiddle.
Our next filter in the line-up is Sepia. I am not exactly sure how to explain what the filter does aside from adding a yellow-orangish hue to an image. I suppose it is sort of a vintage effect?
There is actually an exact mathematical process to achieve the Sepia coloration. Each color channel gets a specific calculation as follows (grabbed from CS50 assignment guidelines):
Taking this into consideration, the Sepia filter will be much like our grayscale filter. The only difference is that instead of applying a single color value to the three RGB channels we will be applying the mathematical equation as presented above. Due to the multiplication involved, this is where our handy MAX function comes into play. Since the values could end up higher than 255, we need to make sure we have a way to truncate it. With no further ado, here is the code I drummed-up for Sepia:
// Convert image to sepia
void sepia(int height, int width, RGBTRIPLE image[height][width]) { for (int r = 0; r < height; r++) { for (int c = 0; c < width; c++) { // Get RGB values. float red = image[r][c].rgbtRed; float green = image[r][c].rgbtGreen; float blue = image[r][c].rgbtBlue; // Convert to Sepia. image[r][c].rgbtRed = MAX(round(.393 * red + .769 * green + .189 * blue), 255); image[r][c].rgbtGreen = MAX(round(.349 * red + .686 * green + .168 * blue), 255); image[r][c].rgbtBlue = MAX(round(.272 * red + .534 * green + .131 * blue), 255); } } return; } You'll be able to notice fairly quick that the beginning of this code is exactly like our grayscale code (perhaps we can create a procedure in the future to handle this so we do not need to incorporate the duplicate code). The difference is that this time, instead of finding the average of all three values and then applying it to each color node we are instead taking specific percentage values from each color and adding them together. It is important that our values are floats because you'll note that before finishing the equation we round our final value. If the numbers were not floats you would not get an accurate rounding. While one integer off in a 255 color channel is not the end of the world (and probably not noticeable by the naked eye), it is important in the grading metrics for these assignments! Here is what you should expect to get after applying the Sepia filter to your images: The outcome of applying the Sepia filter is really beautiful. While I, myself, would not call it an "antique" look, it certainly has a comforting feeling to it. The saturation almost gives it a tranquil post-apocalyptic feel. Despite the gloomy feel that may perpetuate, the brightness and contrast in all of the variations of color still give it a lively feel that you cannot help but feel satisfied with. Hopefully you've enjoyed working on this so far as well. Once you're complete, it's time to move on to the next filter... Reflect!
Just how it sounds. While you would think as you progress through your assignment things would get harder. I like to think of this filter as a small reprieve - or break - during our brain-busting other work.
The goal of this filter is simply to "flip" your image on the vertical axis - much like looking in a mirror. The end product being a reflection of the original image. While this may sound difficult. It is, actually, very simple if you take the correct approach. The idea is to take your rows of pixels and write them in reverse. In order to do this correctly, though, we will need to write them to a temporary "holder". If we do not, we will end up writing to the very self-same pixels we will be reading half way through the row and getting some extremely unwanted results. Here's the entire code for my implementation of reflect. After this I will explain the parts and how they function:
// Reflect image horizontally
void reflect(int height, int width, RGBTRIPLE image[height][width]) { RGBTRIPLE new[width]; for (int r = 0; r < height; r++) { // Collect reverse data in new RGBTRIPLE array. for (int c = 0; c < width; c++) { new[width - c - 1] = image[r][c]; } // Write array back to complete line. for (int c = 0; c < width; c++) { image[r][c] = new[c]; } } return; } Makes perfect sense. Right? Great! Have fun on your journey! ...just kidding! Don't get out of shape. This code looks slightly different than our previous two filters. Let's start with this declaration:
Here we are declaring a new object of Type RGBTRIPLE with the name 'new'. It is going to be holding enough pixels for the entire row, so we will declare it as size 'width' (which is passed to us in the function arguments).
NOTE: RGBTRIPLE is actually a struct. It is defined in bmp.h. In our first for loop we are going to loop through each row (r) of the image. In our nested for loop we will go through each pixel of that row as a column (c). Since each pixel is already defined as an RGBTRIPLE all we need to do is copy that value to the opposite end of our holder 'new'. We accomplish it with:
Basically, we are telling our program that we want to write to the (n)th value of 'new', and we want to write the (n)th value of 'image' to it. In our case we are writing to [width - c - 1]. We use width to specify the highest value of the row (or end) and add in -1 to account for the array of pixels starting with 0 instead of -1, so the last pixel will actually be 349 in a 350 pixel wide image. We also account for c - which is our loop iteration - so it continues to increment toward 0 to write the new pixels in reverse order. Once the loop of columns is done for the row we are working on, we start a new for loop. We are looping the number of columns again, but this time it is so we can copy our 'new' row directly back to the 'image' row so our reverse order of pixels is back in the new image. This is a direct one-to-one copy, so no special math or enumeration is needed:
As this reads, we are copying our (n)th value of 'new' directly to the (n)th value of 'image' in whatever working row we are currently looping through in [r]. When done processing you should end up with a perfectly mirrored BMP file: The Reflect filter was super fun and it gives you a basic idea on how to re-use Types and structs in a meaningful way. I hope this helped someone get through this section of filter in a concise and productive way!
If you had any question at all as to why Reflect was so easy, Blur is quiet possibly the answer to that question. Blur makes use of every skill you have learned in Filter-Less so far and turns into an amalgamation of intricate contraptions to employ what is possibly the most difficult filter (as it should for the last one in this assignment).
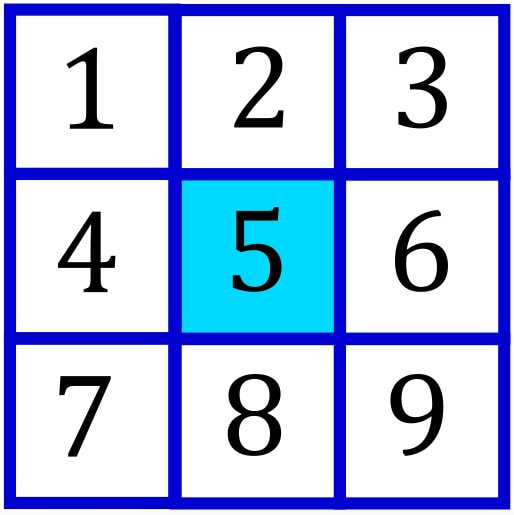
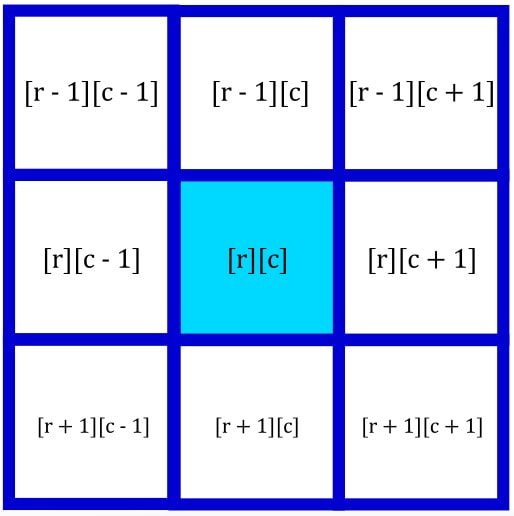
Blur is just what is reads to be. You are blurring your image to an extent where things become just a little less visible. It uses what is known as the box blur method, which essentially takes into account a 'box' of pixels around your focus pixel to develop a colorizing algorithm that defines what the color of your pixel should be to create the "blur" effect you are looking for. To achieve this, the best way to do this is to get a 3x3 sample of the area encompassing the active pixel, including the pixel itself. Like so:
To accomplish this we need to account for all of the pixels in our 3x3 grid, get each of their RGB values separately, and then average them out and save that average to our pixel per each RGB value. This is where things are going to get tricky. At the corners and at the edges we do not have nine values to account for, so using standard mathematical operations and dividing by nine (9) to account for our grid is going to produce the wrong values! We are going to have to implement some sort of logic in our code to determine what and where we are scanning during our pixel plotting so we perform the right math in the right situation. Here is the final code I produced for blur. Read through it and then continue on if you would like to get a small explanation of what is happening in the code:
// Blur image
void blur(int height, int width, RGBTRIPLE image[height][width]) { // Let's create a temporary pixel matrix. RGBTRIPLE new[height][width]; // Copy sample image to another image with a 1 pixel buffer. RGBTRIPLE buffer[height + 2][width + 2]; for (int r = 0; r < height; r++) { for (int c = 0; c < width; c++) { buffer[r + 1][c + 1] = image[r][c]; } } // Cycle through and collect data. Divide depending on position. // Start at row 1 and column 1 since buffer image is offset. for (int r = 1; r <= height; r++) { for (int c = 1; c <= width; c++) { RGBTRIPLE field[9] = {buffer[r - 1][c - 1], buffer[r - 1][c], buffer[r - 1][c + 1], buffer[r][c - 1], buffer[r][c], buffer[r][c + 1], buffer[r + 1][c - 1], buffer[r + 1][c], buffer[r + 1][c + 1]}; int divisor = 0; // Define Corners if (((r == 1) && (c == 1)) || ((r == 1) && (c == width)) || ((r == height) && (c == 1)) || ((r == height) && (c == width))) { divisor = 4; } // Define Edges else if ((r == 1) || (r == height) || (c == 1) || (c == width)) { divisor = 6; } // Define Inner else { divisor = 9; } float redValue = 0; float greenValue = 0; float blueValue = 0; for (int s = 0; s < 9; s++) { redValue = redValue + field[s].rgbtRed; greenValue = greenValue + field[s].rgbtGreen; blueValue = blueValue + field[s].rgbtBlue; } redValue = MAX(round(redValue / divisor), 255); greenValue = MAX(round(greenValue / divisor), 255); blueValue = MAX(round(blueValue / divisor), 255); new[r - 1][c - 1].rgbtRed = redValue; new[r - 1][c - 1].rgbtGreen = greenValue; new[r - 1][c - 1].rgbtBlue = blueValue; } } // Copy all new bits to image. for (int r = 0; r < height; r++) { for (int c = 0; c < width; c++) { image[r][c] = new[r][c]; } } return; } While I know this is a lot to take in at first, there is logic behind every step. Once that unfolds this all makes pretty good sense. Let me take a stab at detailing what happens here. To begin, we are going to need to reserve temporary space to write out our new image. We cannot write our values out to the current image yet because it will skew our existing pixels that we need to account for when calculating our new values.
This quick call generates a grid of RGBTRIPLE (pixels) in the same height and width of the image we are altering. For sanity's sake, I have named it 'new'.
In order to accommodate our 3x3 scanning grid we need to be able to accept the 3x3 grid on the corners and edges while having the corner and edge pixel in question in the center of the grid. In order to do this we will need to create a one (1) pixel buffer around our image to take the samples.
My new RGBTRIPLE grid, 'buffer', is the same size as our image, plus two (2) pixels in both height and width. This will allow us to create a one (1) pixel border around the entire image.
So, I load-up a 2D for loop and grab our image pixels and write them to this new buffer. Make note of the + 1 in both row and column fields in the buffer array. This is to offset the image by one (1) pixel both vertically and horizontally when written into the buffer, creating our one (1) pixel border.
In the next for loop we will begin cycling through this buffer to obtain our pixel data. It is important to note that we start at (1, 1) to account for the border.
During this loop we load all nine (9) pixels into our 3x3 grid which we have named 'field' in this particular situation. The order does not matter, but pay close attention to the + 1 and - 1 offsets because they are critical in gathering the correct data. I am not going to paste all of the code for the next section, but this is where we go in and manually identify the corners and edges of the provided image passed into our function. We calculate these with logic statements to determine if it is at (1, 1), (1, width), (height, 1), and (height, width) for corners, and if not one of those then check if we are at least at (*, 1), (1, *), (height, *), or (*, width) for edge pixels. If so, then we set our average's divisor to four (4) or six (6), respectively. This accounts for the missing pixel data we will have in those areas. If it is not in one of these pixel positions we can safely assume all pixels will be in the grid and our divisor is automatically set to nine (9). So, to determine our averages we will need: p1.blue + p2.blue + p3.blue + p4.blue + p5.blue + p6.blue + p7.blue + p8.blue + p9.blue / divisor That is not the actual expression phrasing, but this is how you are going to determine the average for each color channel for the one specific pixel you are analyzing at the time of this loop. The remaining part of this function looks a lot like the rest of our functions we have done so far for grayscale, sepia, and reflect. We gather the red, green, and blue values for the pixel. We then use our round and MAX functions to average them out. Finally, we apply them to the temporary storage we have in 'new'. Once all of the for loops are complete, we do another quick run and copy our temporary RGBTRIPLE storage of 'new' back into 'image'. This has successfully written all of our new color data back into the image and should be fully blurred! Here are our results when passed onto all of the great images that were provided by CS50 for this assignment: ...and that's IT for Filter-Less! If you had fun with this one (like I did), I hope you decide to move on and try Filter-More. There's lots more to be done with images and filters!
Grayscale is a filter for changing an image from all of its color values to a shade of gray that is reflective of the color variations without the saturation of color. This was completed in the previous section for Filter (Less). Please [click here] to read about this work.
Blur was one of the hardest filters that we covered in the previous section in Filter (Less). Since this was such a long section, I will not be re-covering it here. If you would like to review how Blur was implemented last time, please [click here] to check out that work! (You won't leave this page, it's just further up!)
Edges is by far the most difficult filter we have encountered yet. It uses an intricate algorithm to determine where hard deviations are between pixels and generate a colorization of pixels that essentially "outlines" areas where these "edges" are detected throughout your image. It's a really neat effect and can generate some beautiful imagery when done correctly. Much like our Blur function from Filter (Less), there are lots of the same elements we will use to begin working towards our goal in Edges. We will create a 1px buffer border, and create a 3x3 intake grid just like before. It is our calculation of those pixels that we evaluate that becomes the greatest change to complete this filter. The Edges filter make use of a grid 'kernel'. This grid is used to evaluate both the X-axis change and Y-axis change in pixel properties in their respective directions. This helps us determine if there is a vertical or horizontal pitched edge, instead of looking for edges in one direction. After collecting our pixel data, a method called the 'Sobel' algorithm is applied to combine the x (Gx) and y (Gy) data and successfully come up with a value which represents if there is an edge or not. With all of this information in mind, here is the code for Edges:
void edges(int height, int width, RGBTRIPLE image[height][width])
{ // ATTEMPT #3 // Create buffer with 1px border. RGBTRIPLE buffer[height + 2][width + 2]; // Fill buffer with 0 values. for (int r = 0; r < height + 2; r++) { for (int c = 0; c < width + 2; c++) { buffer[r][c].rgbtRed = 0; buffer[r][c].rgbtGreen = 0; buffer[r][c].rgbtBlue = 0; } } // Create Gx kernel. int gx[3][3] = {{-1, 0, 1}, {-2, 0, 2}, {-1, 0, 1}}; // Create Gy kernel. int gy[3][3] = {{-1, -2, -1}, {0, 0, 0}, {1, 2, 1}}; // Copy image to buffer and place in middle of 1px border. // Rows for (int r = 0; r < height; r++) { // Columns for (int c = 0; c < width; c++) { buffer[r + 1][c + 1] = image[r][c]; } } // NOTE: Image is in buffer now, we can safely write out to the origianl. // Begin scan. for (int r = 1; r <= height; r++) { for (int c = 1; c <= width; c++) { // Grab pixel data. RGBTRIPLE scanner[3][3] = {{buffer[r - 1][c - 1], buffer[r - 1][c], buffer[r - 1][c + 1]}, {buffer[r][c - 1], buffer[r][c], buffer[r][c + 1]}, {buffer[r + 1][c - 1], buffer[r + 1][c], buffer[r + 1][c + 1]}}; // Define variables. int Gx_redValue = 0; int Gx_greenValue = 0; int Gx_blueValue = 0; int Gy_redValue = 0; int Gy_greenValue = 0; int Gy_blueValue = 0; int redValue = 0; int greenValue = 0; int blueValue = 0; // Calculate Gx. for (int s1 = 0; s1 < 3; s1++) { for (int s2 = 0; s2 < 3; s2++) { Gx_redValue = Gx_redValue + (scanner[s1][s2].rgbtRed * gx[s1][s2]); Gx_greenValue = Gx_greenValue + (scanner[s1][s2].rgbtGreen * gx[s1][s2]); Gx_blueValue = Gx_blueValue + (scanner[s1][s2].rgbtBlue * gx[s1][s2]); } } // Calculate Gy. for (int s1 = 0; s1 < 3; s1++) { for (int s2 = 0; s2 < 3; s2++) { Gy_redValue = Gy_redValue + (scanner[s1][s2].rgbtRed * gy[s1][s2]); Gy_greenValue = Gy_greenValue + (scanner[s1][s2].rgbtGreen * gy[s1][s2]); Gy_blueValue = Gy_blueValue + (scanner[s1][s2].rgbtBlue * gy[s1][s2]); } } // Sobel. redValue = MAX(round(sqrt(pow(Gx_redValue, 2) + pow(Gy_redValue, 2))), 255); greenValue = MAX(round(sqrt(pow(Gx_greenValue, 2) + pow(Gy_greenValue, 2))), 255); blueValue = MAX(round(sqrt(pow(Gx_blueValue, 2) + pow(Gy_blueValue, 2))), 255); // Write to image. image[r - 1][c - 1].rgbtRed = redValue; image[r - 1][c - 1].rgbtGreen = greenValue; image[r - 1][c - 1].rgbtBlue = blueValue; } } return; } A lot of this code probably looks familiar if you followed along with me for Blur in the previous section. We create our buffer image and copy over the original image to it in the center so there is a 1px border. This one is a little different since we go ahead and fill-in every value in the buffer to (0, 0, 0) first to ensure our math later in the function works correctly. This time we create something called kernels here:
These are the 3x3 grids that contain the multipliers needed to find the Gx and Gy values for the Sobel algorithm later in our function. Each cell of our grid contains a multiplier -2 thru 2. This assist in creating a clear definition in variation between rows or columns of pixels. In our primary for loop we perform the steps to analyze the pixel data, apply our mathematical functions, and finally write our image. We start by collecting the standard pixel data for our focus pixel and the surrounding pixels in our 3x3 grid named 'scanner'. This is just like how we collected information in Blur. Then we begin declaring all of the variables that we are going to need to process our information in a logical order. Then, we begin performing the calculations to find our Gx and Gy values:
// Calculate Gx.
for (int s1 = 0; s1 < 3; s1++) { for (int s2 = 0; s2 < 3; s2++) { Gx_redValue = Gx_redValue + (scanner[s1][s2].rgbtRed * gx[s1][s2]); Gx_greenValue = Gx_greenValue + (scanner[s1][s2].rgbtGreen * gx[s1][s2]); Gx_blueValue = Gx_blueValue + (scanner[s1][s2].rgbtBlue * gx[s1][s2]); } } // Calculate Gy. for (int s1 = 0; s1 < 3; s1++) { for (int s2 = 0; s2 < 3; s2++) { Gy_redValue = Gy_redValue + (scanner[s1][s2].rgbtRed * gy[s1][s2]); Gy_greenValue = Gy_greenValue + (scanner[s1][s2].rgbtGreen * gy[s1][s2]); Gy_blueValue = Gy_blueValue + (scanner[s1][s2].rgbtBlue * gy[s1][s2]); } } How we calculate the Gx and Gy is by looping through our collected pixel data in scanner. (Remember, we need to do this for the red, green, and blue values individually in the RGBTRIPLE). As we iterate through each pixel we use the same iterative position on the corresponding Gx or Gy grid that we created earlier in our function. So, as it iterates through the pixels it uses the Gx or Gy table to multiply the pixel color value by -2 thru 2 as indicated by the Gx or Gy grid value: 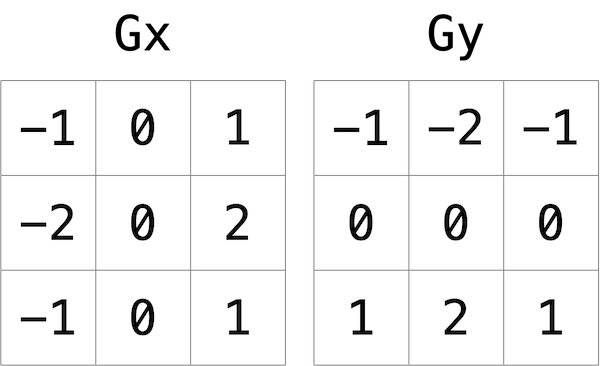
https://cs50.harvard.edu/x/2023/psets/4/filter/more/, 2023
After performing these calculations, we can now do the Sobel calculation to find out if there is an edge or not. A value close to zero (0) would indicate that there isn't an edge. A value higher would indicate an edge. The overall color of the pixel will display this variation in color.
NOTE: Sobel is calculated as the square root of [Gx^2 + Gy^2].
redValue = MAX(round(sqrt(pow(Gx_redValue, 2) + pow(Gy_redValue, 2))), 255); greenValue = MAX(round(sqrt(pow(Gx_greenValue, 2) + pow(Gy_greenValue, 2))), 255);
blueValue = MAX(round(sqrt(pow(Gx_blueValue, 2) + pow(Gy_blueValue, 2))), 255); In this calculation we take a lot of advantage of the <math.h> header. (Make sure to #include it in your project!) I spent a lot of time breaking everything because I was under the impression that C worked like every other language in the world and used ^2 as the superscript representation of squared arithmetic. Boy, was I wrong. In C you want to perform 'raised by' equations by using the <math.h> function pow(). This is the equivalent of "power of" and accepts two arguments: your original value, and the power you wish to raise it by. I.E.: pow(10, 2) would be the same as saying "ten to the second power", or 10^2. In our expression we calculate the square of Gx and Gy, add them together, and then use another <math.h> function sqrt() to find the square root of these values. We then round it to the nearest integer, and use our custom MAX() function (explained earlier in Filter (Less) to make sure our ending value does not exceed 255. Lastly, we write all of our new pixel values back out to the original image:
This leaves us with our finalized Edges filtered image! It will be written to whatever output file we originally indicated in our arguments when executing our program. Your results should look similar to mine, which you can check out here: That's it for Edges! I hope you found this article interesting and helpful. There is nothing else involved for Filter (More). Stick around for the next part of Week 4: Problem Sets, Recover! It will be about retrieving lost data (images in this case) by searching patterns in memory. I hope to have it added to this entry soon!
If data manipulation hasn't caught your attention yet, you might just be waiting to get your hands into recover.c! This is what data work is all about. Here we have the awesome task of recovering lost data from a corrupt USB drive!
In this scenario, you can imagine that a customer has brought you a USB drive or an SD card and states that they can no longer locate any of their images. Keepsakes from lost family members that they will never see again. Your only desire is to help them locate these lost files an reconnect them to memories they thought they would never be able to experience again! To start, CS50 has provided you with the boilerplate code for recover.c:
Not much to look at, right? That's great! It gives us an exponential amount of freedom to approach this however we want. It also challenges us to expose the skills we have developed thusfar throughout the course. Knowing what we have to work with, let's look at a brief description of the overall goals of this project.
(Paraphrased from guidelines found on CS50)
So, really, it isn't a lot. Much of these processes we can cobble together from previous assignments we have done in our prior work for CS50. I viewed it like this:
Okay. Simple enough. Our program will be built off of this class file. Boilerplate is already in place. Just need to code this out.
We used command line arguments and testing in a number of previous projects so far, so this is pretty easy to manage so far. Just test for argc and the count thereof. Luckily, we can see that the project zip file already contained card.raw, which will be our forensic data for this assignment.
See above. This should be easy to account for.
A little more involved now. However, nothing we shouldn't be able to handle. Just need to make sure we know how to handle the file check.
Okay. We need to be a little more involved here. This will likely require some integer tracking and value changes while writing files out. Wait... how do you keep leading zeros? This will take some research.
Alright. If we use malloc we need to be sure to free-up any memory before we close out our program. So, we've got the idea on how we are going to approach this. Even though no details about implementing the file recovery itself were in there, let's start hashing this out! It's really important that you watch the supplemental video with this assignment. It goes over many more details and provides methods to completing this assignment that you may not have encountered yet that were somehow left out of the project text. Here is the final code that I generated for Recover. If you're interested in the details, I will break it down thereafter so you can see what each step does along the way:
#include <stdbool.h>
#include <stdint.h> #include <stdio.h> #include <stdlib.h> #include <string.h> // Assignment Monitoring: // [√] Program should accept only one command-line argument (name of image) // [√] If NOT, remind user of correct usage, return a value of '1'. // [√] If file cannot be opened, update the user, return a value of '1'. // [√] Output file(s) should be name a three-digit number starting with '000'.jpg and incrementing. // [√] If malloc is used, should not leak any memory. int main(int argc, char *argv[]) { // Constants int BLOCK_SIZE = 512; // Accept only one argument. if (argc != 2) { printf("Usage: ./filter <filename>\n"); return 1; } // Check for file, error if unable. FILE *file = fopen(argv[1], "r"); if (file == NULL) { printf("The file: %s was not found, or will not open.\n", argv[1]); return 1; } // Scan file for JPEGs to begin extraction of file(s). // JPEGs should begin with four bits containing: // 0xff 0xd8 0xff 0xe* (where * can be any character). // NOTE: All stored in 512 byte blocks. All JPEGs will be stored consecutively. int filenum = 0; char *filename = malloc(8); typedef uint8_t BYTE; BYTE buffer[BLOCK_SIZE]; bool writing = false; while (fread(buffer, 1, BLOCK_SIZE, file) == BLOCK_SIZE) { // Detect JPEG and begin file write. if ((buffer[0] == 0xff) && (buffer[1] == 0xd8) && (buffer[2] == 0xff) && ((buffer[3] & 0xf0) == 0xe0)) { writing = true; sprintf(filename, "%03i.jpg", filenum); FILE *outfile = fopen(filename, "a"); filenum++; fwrite(buffer, BLOCK_SIZE, 1, outfile); fclose(outfile); } else if (writing) { FILE *outfile = fopen(filename, "a"); fwrite(buffer, BLOCK_SIZE, 1, outfile); fclose(outfile); } } free(filename); // Close file. fclose(file); } This code is 100% working, passed check50 at the time of this writing and was confirmed "well-written" by style50. When defining CONSTANTS I always like to put them at the topmost part of my code so they are easily located in case they need to be tweaked for any reason. It is always best practice to name constants in ALL CAPS to help identify that the value being used is a CONSTANT. (CONSTANTS are re-usable variables that are never changed throughout your code and can be helpful in many situations!) My only CONSTANT in this code is this:
This defines the size of the blocks we need to use as samples in the code. Since it will be used frequently for the same reference, I want to make it a CONSTANT so if I find later it needs to be changed I can simply change the value here instead of many places throughout my code.
Not unlike many of our command line programs so far, we need to limit and enforce the number of arguments passed into the program:
We handle this with a simple logic statement (if (argc != 2). Meaning, if there are not two blocks of text (the command and the argument) when executed, then execute the code that follows. Our follow-up code simply outputs information to the user on how to properly execute the program. return 1 closes out our program and returns a system error code of '1' that can be tracked and/or reported on if one so wishes. Next, we initialize the variables we are going to use during our investigative file process:
These are the critical building blocks that are going to make all of our code work and come together in the end. Without them we could not process any of the data in a neat linear fashion like we are going to do in the upcoming lines.
Using while not only begins the loop that will cycle through our RAW data 512 bytes at a time, it also starts the fread call that digs into our file and start assigning those 512 "chunks" to the buffer so we can start processing code throughout the loop. The code may look cryptic at first, but it simply reads: "While we are reading data, read it into 'buffer' one (1) time at five-hundred-twelve (512) characters from our currently open file named 'file'. If the block we are checking does not contain 512 characters go ahead and stop the loop." Make sense? Good. The next line of code is one of the most critical. It is what defines the start of a JPEG image is by looking for the header in HEX values:
if ((buffer[0] == 0xff) && (buffer[1] == 0xd8) && (buffer[2] == 0xff) && ((buffer[3] & 0xf0) == 0xe0))
A JPEG header will always begin with 0xff 0xd8 0xff, but the last byte can always start with 0xe and can end in any other value. Unfortunately, we do not have a way to just seek out the first three characters of a hex value. So, we apply a BITWISE operator (buffer[3] & 0xf0) == 0xe0 to the last byte which will always force the last character to 0 instead, while maintaining the integrity of the values we are looking for. Thusly, we can always check the last byte for 0xe0. If the first four (4) bytes of our 512 chunk match, we can start exporting these bytes as a new JPEG! Following that if statement we have two core sections which create the overall process which generates our JPEG images:
Without trying to go through and break down each line of code, I will describe the sections for you the best that I can. After all, who wants to read all of that? We enable the writing bool, letting our loop know we are going to start writing to our output JPEG file. Using our filenum variable, we create a string in filename representing the interval number of JPEG file we are working on. Then, we open (or create) that file using fopen with the "a" attribute that will open a file for writing and add new lines to it, and create the file if it doesn't exist. We increase our filenum so that the next time we create a file it will be a different number. We then write our 512 block of characters to that file with fwrite. Once we are done writing, we close the file. The next time our loop iterates it doesn't detect a JPEG header, but now it detects the writing bool is true. Since it knows we are writing it prepares this next block of code, again opens our file with filename using fopen, writes the data to the file with fwrite, and then closes it up. It repeats this process until the forensic file card.raw is at the end.
The last little bit of our code uses free to empty out the memory that we had reserved with malloc earlier in our code for storage of our filename. We then safely close our file with fclose and we're done! When you compile and execute your code you should end up with forty-nine (49) complete JPEG files that you can open in your browser without any errors. I hope you enjoyed this nifty and fun little project. I know I did!
Ready to start your big music career? Look no further than here! With the skills and talents that you will develop while working on the Reverse assignment in this week of CS50 you will be able to master the bits of sound files (WAV in this case) in no time!
The goal of Reverse is to take an existing Waveform Audio File (WAV) that is supplied by CS50, read the bits from it, and successfully turn it into a playable WAV file that is reversed. That means you will play the same exact audio, only backwards. Luckily, the WAV file supplied for this assignment is only 2 seconds long of a couple of notes being played on a piano. For instructional purposes, here are the two files for contrast:
The two sound file, although similar, are quite different, aren't they? Playing with data can have interesting results! By tweaking value and pouring out lines of code, we can generate lots of different sounds using the same input.wav. By the time you are done with this assignment you should be able to pull in any WAV file and output the proper reverse sound of that exact sound. Here are some possibilities just by changing one or two items in your code:
Without further ado, here is our code for reverse:
#include <stdint.h>
#include <stdio.h> #include <stdlib.h> #include <string.h> #include "wav.h" int check_format(WAVHEADER header); int get_block_size(WAVHEADER header); int get_chunk_size(WAVHEADER header); // Assignment Monitoring: // [√] Check character (for copy and paste) // [√] Program should accept only one command-line argument (name of image) // [√] If NOT, remind user of correct usage, return a value of '1'. // [√] If file cannot be opened, update the user, return a value of '1'. // [√] Output file(s) should be name a three-digit number starting with '000'.jpg and incrementing. // [√] If malloc is used, should not leak any memory. int main(int argc, char *argv[]) { // Ensure proper usage // TODO #1 if (argc != 3) { printf("Usage: ./reverse <input filename> <output filename>\n"); printf("(These files should end in .WAV)\n"); return 1; } // Open input file for reading // TODO #2 FILE *in; in = fopen(argv[1], "r"); if (in == NULL) { printf("The requested file <%s> was not found.\n", argv[1]); return 1; } // Read header // TODO #3 WAVHEADER *filehead = malloc(44); fread(filehead, 44, 1, in); // Use check_format to ensure WAV format // TODO #4 if (!check_format(*filehead)) { printf("%s is not a valid WAV file.\n", argv[1]); return 1; } // Open output file for writing // TODO #5 FILE *out; out = fopen(argv[2], "w"); if (out == NULL) { printf("Unable to successfully open or create %s!\n", argv[2]); return 1; } // Write header to file // TODO #6 fwrite(filehead, 44, 1, out); // Use get_block_size to calculate size of block // TODO #7 int bs = get_block_size(*filehead); // Write reversed audio to file // TODO #8 int arrSize = get_chunk_size(*filehead) / bs; BYTE storage[arrSize][bs]; int sample = 0; while (fread(storage[sample], bs, 1, in) > 0) { sample++; } for (int i = arrSize - 1; i >= 0; i--) { fwrite(storage[i], bs, 1, out); } free(filehead); fclose(out); fclose(in); } int check_format(WAVHEADER header) { // TODO #4 char tst[5]; for (int c = 0; c < 4; c++) { tst[c] = header.format[c]; } tst[4] = '\0'; if (strcmp(tst, "WAVE") == 0) { return 1; } return 0; } int get_block_size(WAVHEADER header) { // TODO #7 int bs = 0; int intChan = header.numChannels; int intBPS = header.bitsPerSample; intBPS = intBPS / 8; bs = intChan * intBPS; return bs; } int get_chunk_size(WAVHEADER header) { return header.subchunk2Size; } It's late here and I'm not getting into breaking down all of the code right now. Take a look and see what you think! If you'd like additional information on bits of this code, feel free to ask and I'll get back to you as soon as possible! Thanks!
0 Comments
Leave a Reply. |
Weeks navWeek 0AuthorJonathan Styles (4verageGamer) is just a simple student of all things IT-related during this pursuit of completing the CS50 class from Harvard. Archives |
 RSS Feed
